The Page Plan.
Tools required:
Large paper, preferably translucent like layout, vellum or tracing. 11 x 14 paper is ideal, but 8.5 x 14 is fine too.
Triangle and ruler.
Fine-pointed pens, or very sharp pencils.
Eraser
Sharpener.
We are at around the midway point in the process, so let’s look ahead to the end.
Ideally I would like you finish the class with two products: a submittable dummy pdf, and a self-published book.
These two items could be very different, or virtually the same, depending on how you approach them.
One key difference is that the self-published book really is a finished product, whereas the submittable pdf is a work-in-progress.
You can actually sell the self-published book on Amazon, Etsy, or even in bookstores.
If a publishing house is interested in your pdf dummy then the first thing they are going to do is ask you to make revisions—-regardless of how finished you think it is yourself—-and it will be revised by both an editor and an art director. The editor will mostly revise the text, and the art director will mostly revise the visuals, although you will find that the editor will have a lot of input on the appearance too.
Most of the house’s decisions will be in regard to the marketability fo the book.
You could submit your self-published book to a house, and I know people who have done this, although I’m not completely sure how good an idea it is, as there’s a sense with a self-published book that you think it’s a finished product, and you might not be open to revisions.
Barnes and Noble
Marketing people will be involved as well, especially with regard to the title and the cover. In some ways Barnes and Noble will have a lot of input as to how your book is titled and covered, as the publisher will want your book to be in Barnes and Noble stores—-and Barnes and Noble have guidelines that change from year to year. The marketing people will be aware of Barnes and Noble’s guidelines.
Your book might conform to all of Barnes and Nobles guidelines, but that doesn’t guarantee that they will actually shelve it.
Face-Out
Your publisher will have to pay a fee to Barnes and Noble in order to have your book displayed ‘face-out,’ in other words displaying the cover in all its glory, as opposed to ‘spine-out.’
I have heard of authors going from Barnes and Noble to Barnes and Noble, turning their books face out on the shelves.
Barnes and Noble do not take kindly to this activity, and I have heard that they can stop shelving your book if you do this.
Staff Picks
Barnes and Noble also has shelves labeled ‘Staff Picks.’ These are not really picked by the people that work in the store, but again this is a marketing strategy that the publisher pays for.
Independent Book Stores.
None of the above applies to independent book stores.
Face-outs are chosen by the store manager/owner.
Staff picks really are chosen by the staff.
Bookstore Events.
You may be able to set up signings in bookstores, but we’ll come to that later on.
1: Designing a Page Plan.
For both the book and the pdf you will begin with designing a page plan.
You already a have some idea of what the book is going to look like, but you want to make it look as good as you can, so it’s time to think about design—-and design is basically a process of decision making.
Decision 1: Self-ended or End papers? I will make this decision for you: End Papers.
Decision 2: Do you want to make a 24 or 32 page book? Or perhaps even something longer? This might merely be a practical consideration if you are a slow artist, as the 24 page book will be quicker to complete. It’s not set in stone, as a 32 page book can become a 24 page book and vice-a-versa, but you need to make a decision for the present.
Your speed as an artist has nothing to do with how good an artist your are. If you are a digital cartoonist, then the 32 page book will not take a lot longer than the 24 page. On the other hand if you going to make detailed paintings for each page, then a 32 page book could take months longer.
Begin with a page plan.
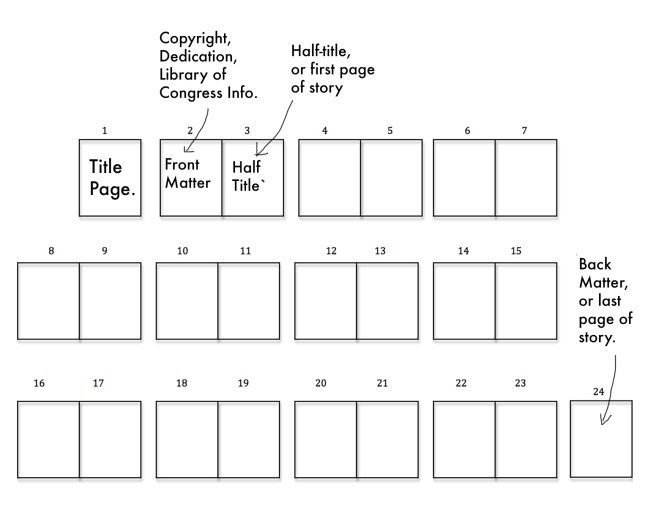
24-page.
32-page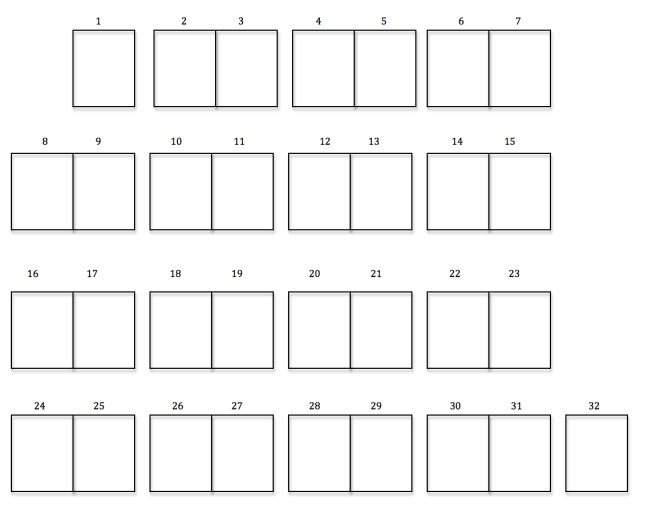
Basically draw out a page plan by hand, on the biggest sheet of paper you can find—-ideally tracing or layout paper that you can see through. Then slowly draw out each spread in miniature, along with the text.
Really draw this by hand even if you could do the task digitally. Drawing by hand slows you down.
Slow is good. It gives you time to think, and turns this particular part of the process into an art form in its own right.
Don’t make this an intermediate chore, as it will reveal significant things about your book. These page plans can be objects of beauty in their own right, but don’t worry if yours isn’t.
Look for how the story flows from page to page, and also look at potential for letting the story flow from words to pictures and back again.
Look for the possibilities of using the page breaks to build suspense.
Look for possibilities in shifts from one full page illustration to several smaller pictures on one page.
If you have—-say—-four smaller pictures on one page, graphic novel style, then be aware that readers read left-to-right and top-to-bottom. Design this sequence so that it’s immediately obvious to even the least experienced reader—-and you will be anticipating inexperienced readers.
Look for the potential to have at least one big illustration across a double-page spread, and preferably two. In fact your book could mostly be double-page spreads if you like, although there are restrictions on how this might work.
The fold in the middle of the page is called the gutter.
If you’re considering a double page illustration it will cross the gutter, and you should avoid putting important details in the gutter, as the two halves of a double-page illustration will be printed separately, and there could be very slight inaccuracies in the trimming and folding.
This issue is not as significant as in the past, but you should still take it into account.
Vary the design from page to page, but not so much that it disturbs the narrative flow.
I suggest that you do at least three page plans, and that is where translucent paper helps, as you can trace from one to the next. I suggest you draw out three sets of blank pages first.
Use any tools that help you in this process, including triangles and rulers.

This is a page plan for my Memoir Picture Book: Fat Cat.
